Tuesday, March 26, 2013

Clothespin People

Yes. Clothespin people. We are gettin reealllll crafty today. Craftaayy, if you will. 


I made this at work yesterday and posted it on my Instagram (follow meeee!) And I got a good response - by good I mean like 10 people liked it. That's a lot. Once again. I saw this idea on the all mighty Pinterest. But I didn't bother to find a tutorial because I knew I could create this on my own. 
AND YOU CAN TOO. But only because I've now created this tutorial. Otherwise you could not. FACT.

SUPPLIES:
Clothespins
Paints
Paintbrushes
Craft Paper
Fabric Scraps
Hot Glue

the black paper is for a top hat, should you choose to add one!

So. Simple Tutorial....


Easy Peasy. and you can do so much with these little things...well I mean you can't really DO anything with them... hold your mail? hang your clothes? What I mean is you can do so much with these things creative wise. Make normal people, not just wedding people. The world needs normal clothespin people too. Ry is mad I made his hair yellow, but it's really hard to mix a dirty blonde paint color!

WE OUT.


Monday, March 18, 2013

DIY Felt Bows


Super cute. Put them on headbands, hair ties, cards, gifts, your cat, really anywhere. 
These things are very versatile everyone. And sooo friggin easy, here we go.

SUPPLIES:
craft felt
scissors
hot glue gun


You will need to cut three pieces of felt, like so:

first - a long piece, which you will use to form the bow
second - a shorter piece, same width as the first
third - even shorter skinny piece to wrap the bow


 aaaannnndddddd....


See!?! So easy. So easy in fact.... 


I made ten thousand. 


WE OUT.

Monday, March 11, 2013

DIY Lace Crown


These are so easy y'all. Yea, Rachel, I said y'all. Again, I've been seeing these all over Pinterest and have been keeping them in the back of my mind so I could make one for Winnie for her 1st birthday - which, ya know, is in August - which I'm already planning. DON'T JUDGE ME. 

SUPPLIES:
lace (tons of different styles at your craft/fabric store)
Fabric Stiffener (although I'm determined Elmer's glue would work just fine...)

Optional:
Acrylic paint
Glitter Mod Podge
Fabric glue

Cut your lace to the desired length - You can make tiny little Alice in Wonderland style crowns, 
or fitted crowns, whatever you want

This is what the lace looks like before you use the Stiffy..hehehe
You want to paint your lace (if you are going to) BEFORE you use the stiffener/glue. I made that mistake. I stiffened the lace first, then painted it and since the paints are water based the lace lost its 
stiff-ness. So. Paint, then stiffen! Let the stiffener dry really well before you you shape it into the crown. I also added glitter Mod Podge on to my crown, because why not?! That's why. 
Glitter is always necessary.

OOOOOO glitttterrrr!

Now take your fabric glue and glue your lace into a circle (it dries almost instantly) Just line up the patten in the lace from one side to the other.


And now you have made a lace crown! wwweeeeeeee!
And tomorrow is my 28th birthday, so I will be wearing one all day.
because I can.
and it's my birthday.
and it's pretty.


we out.

Friday, March 8, 2013

Brooch Bouquet


No, I'm not getting married (durrrr) and no, I did not make this for someone who is getting married. Remember that card line I'm working on at work? Baby & Wedding line? Well. I keep seeing brooch bouquets on Pinterest, so they must be the hip and cool thing right now if you are planning a hipster wedding - and I thought it'd be really cool to make one and then photograph it for a card. 'cept, where the hell do you get 50-60 old gaudy ridiculous brooches??? Your great aunt Ella's. That's where. 

We went up to my parents home town of Weirton, WV this past weekend to celebrate my aunt Janice's 60th birthday! weeeee! love her. It was fun seeing all the fam, and some people who hadn't met Winnie yet, got to.  My uncle wanted me to go over to his mom's (my great aunt Ella's) house and see if I wanted anything. uhhh CHA. So I was looking through her old jewlery and then, JACKPOT!


YOU WILL NEED:
40-60 brooches/pins
floral/craft wire
floral tape
scissors
ribbon (to wrap)


So basically I didn't follow one particular tutorial on how to do this, but I think 
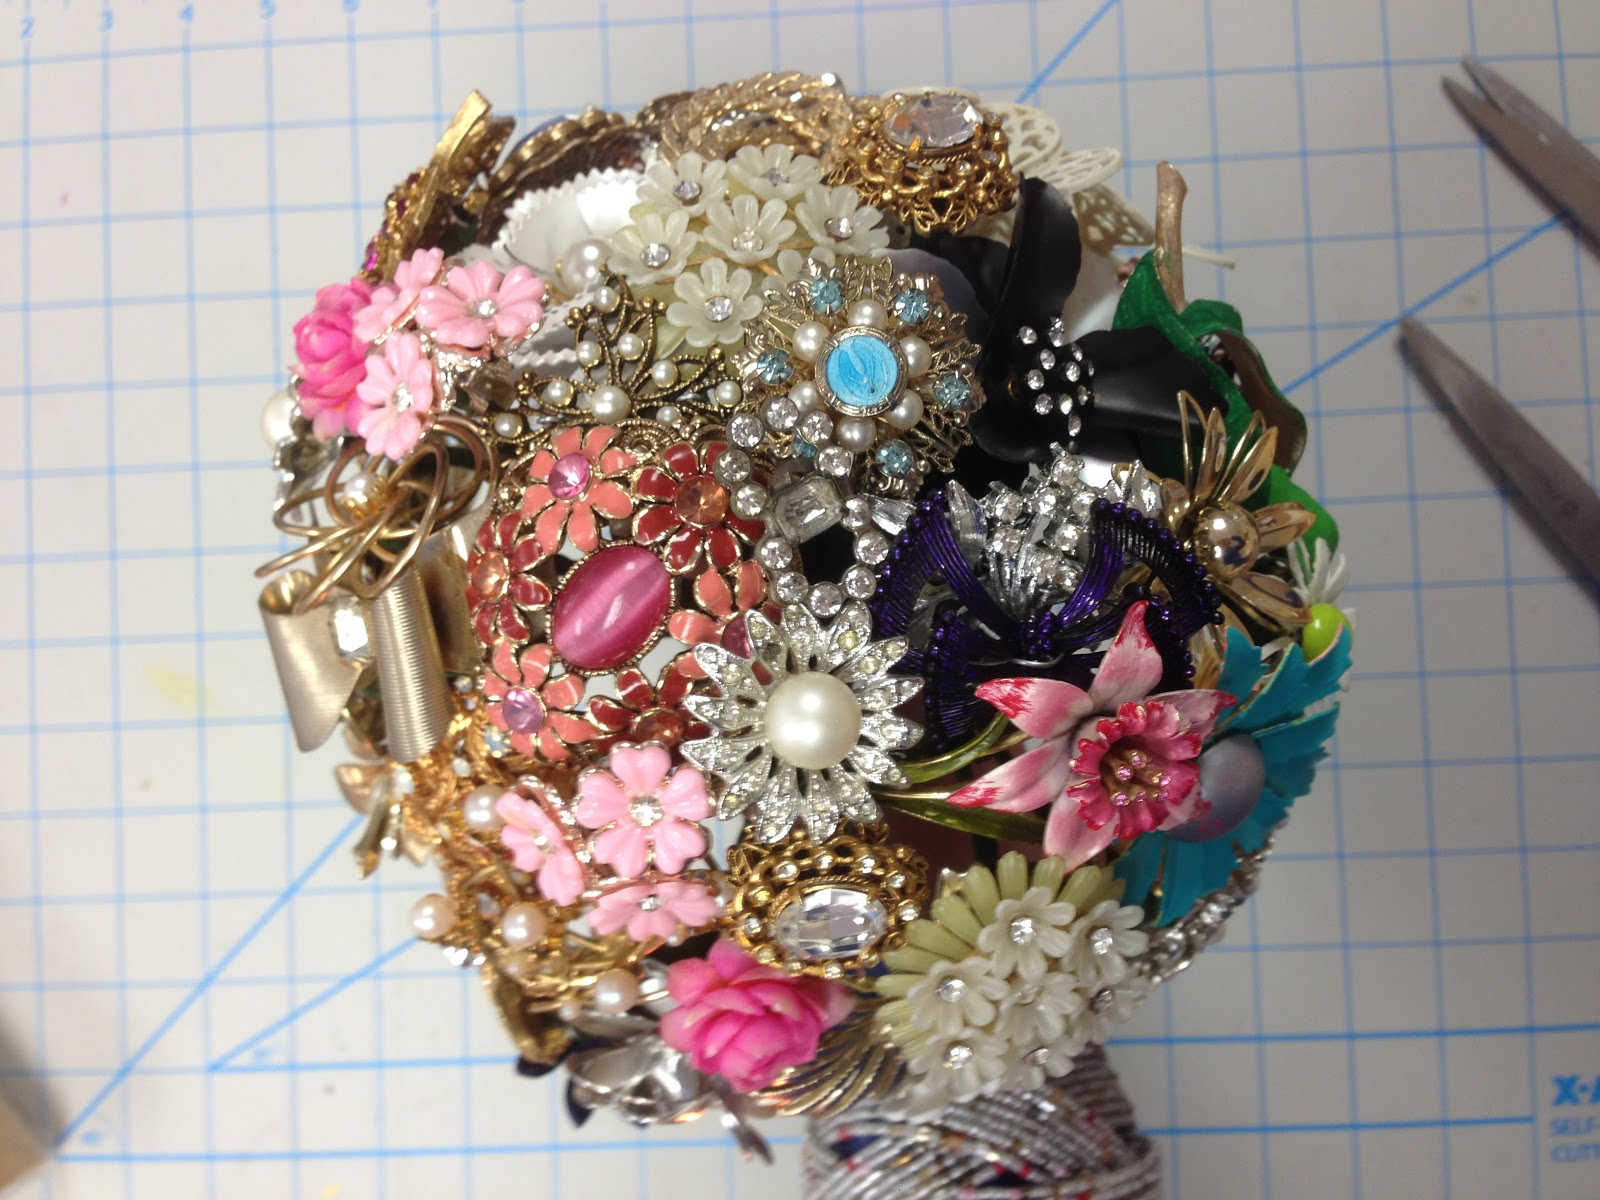
this one is one of the easiest ones to follow.  Basically you just take a brooch and wrap some wire around the pin part... I'm sure there is some science to this part - but I just wrapped the wire all sorts of ways around each end of the pin until it felt study, it's not pretty, but it works. Then twist the wires from each side all the way down to form the stem. You want to make sure your wire is sturdy enough that the brooch won't droop. Take the floral tape and wrap the stem. I wrapped the pin and the top of the wires (the part that looks like a Y) so that it would look neater. Just an FYI the floral wire is kinda gross to work with, it leaves this weird sticky residue on your hands. ew.


So then you do that about 10 billion times and you get this...


And you probably have blistered fingers by now too... cus I do.  I didn't really take any pictures of the next part buuuuuuut you pretty much just arrange the flowers how you want them. I started with one in my left hand and carefully added more with my right hand while holding them in place with my left. Make sense? good. After you've arranged them how you want them to look, get that weird ass floral tape back out and wrap it as tight as you can around all the stems.

(stem wrapped two different views. oooo ahhhh, doesn't it look so puuurrdy!)

Then get your ribbon - or whatever you want to wrap it in.. suggestions: ribbon, twine, wire, burlap, fabric. tulle, beaded wire, cat hair, lace, pretty much anything you want. 
I used ribbon because I'm so elegant..... 


I used another pin to secure my ribbon at the end (do you see it?) but you can just dab some hot glue there and you are good to go!

aannnd view from the top!

I hope you all enjoyed this tutorial, no go! make brooch bouquets! or watch tv. whatevs.

Me & Le Brooch Bouquet!